How to Screenshot on Windows 7: Complete Guide

Taking a screenshot on an older Windows computer can be surprisingly simple. If you are using Windows 7 and want to capture an image of your screen, you have several built-in options, including the Print Screen key, keyboard shortcuts, and the Snipping Tool on supported editions.
Thank you for reading this post, don't forget to subscribe!In this guide, we will explain how to screenshot on Windows 7, where the captured image goes, how to save it, and how to capture only a specific window or part of your screen.
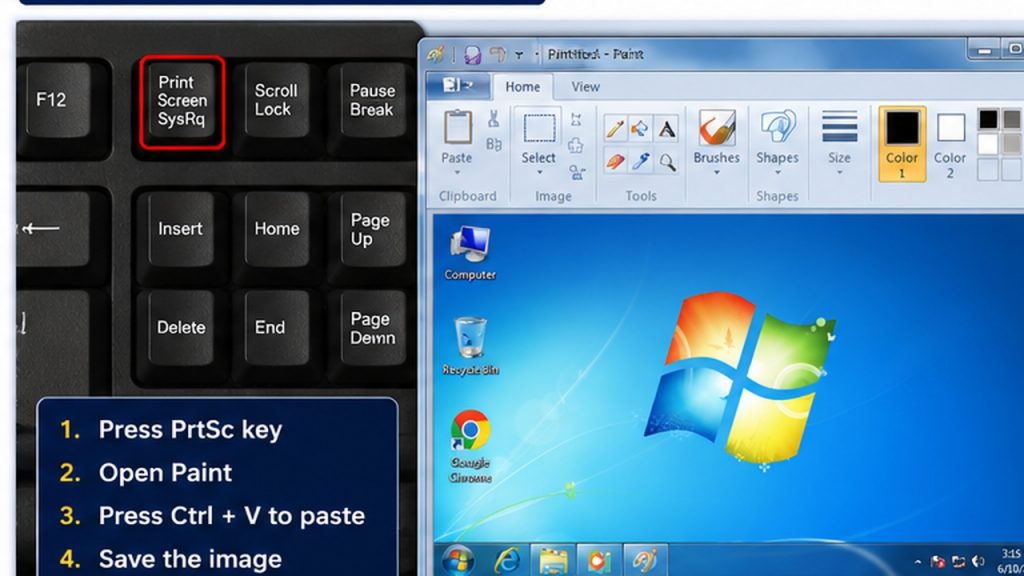
How to Screenshot on Windows 7 Using Print Screen
The easiest method is the Print Screen, sometimes labeled PrtSc, PrtScn, or PrntScrn, key on your keyboard.
Microsoft explains that pressing Print Screen captures the entire screen and copies the image to the clipboard.
Here’s how to do it:
- Open the screen you want to capture.
- Press the PrtSc or PrtScn key.
- Open Microsoft Paint or another image-editing program.
- Press Ctrl + V to paste the screenshot.
- Click File > Save As.
- Choose a location and image format.
- Save the screenshot.
This method is useful when you want a picture of everything currently visible on your monitor.
How to Screenshot an Active Window on Windows 7
Sometimes you do not want to capture the entire desktop. You may only want one application window.
Windows provides a shortcut for this.
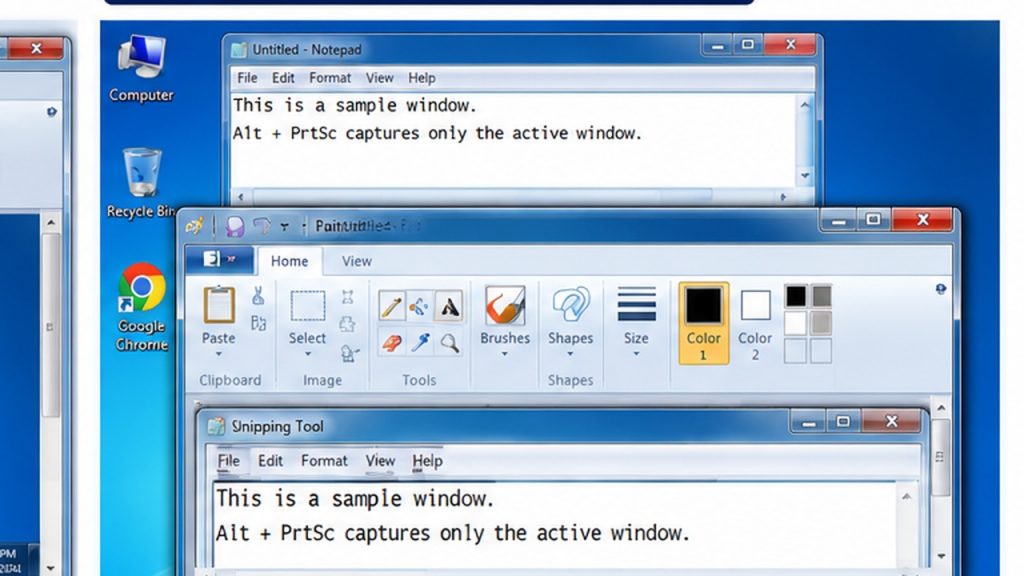
Use Alt + Print Screen
- Click the window you want to capture.
- Press Alt + PrtSc.
- Open Paint.
- Press Ctrl + V.
- Save the image.
Microsoft documents Alt + Print Screen as the method for copying only the active window.
This can be especially useful when you have multiple windows open but only need a screenshot of one application.
How to Use the Snipping Tool on Windows 7
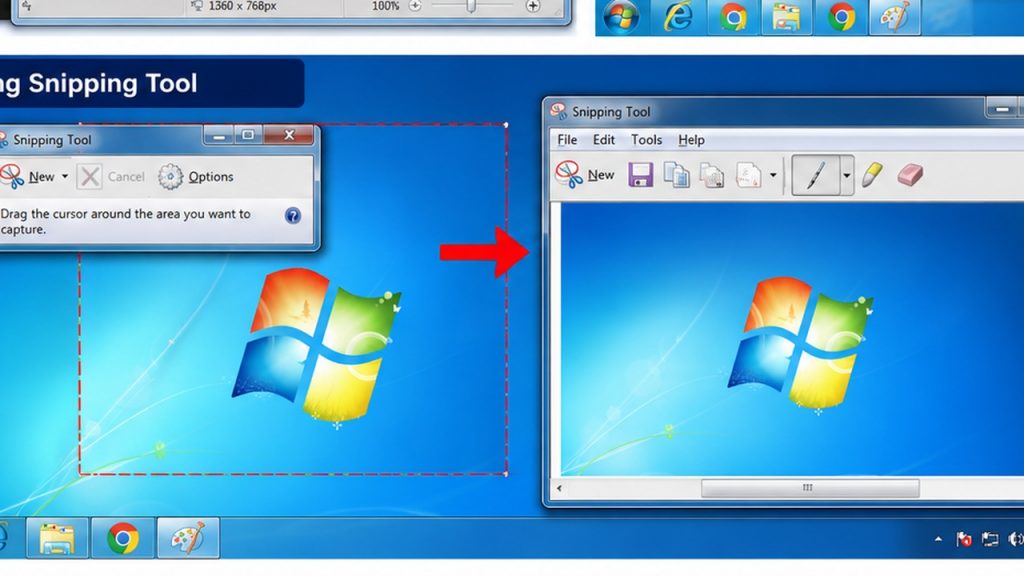
Windows 7 also introduced the Snipping Tool, which can capture a selected part of the screen rather than forcing you to capture the entire desktop.
On supported Windows 7 editions, you can find it by going to:
Start > All Programs > Accessories > Snipping Tool
You can also type Snipping Tool into the Start menu search box.
Microsoft’s historical support information confirms that the Snipping Tool was available on several Windows 7 editions, including Home Premium, Professional, Ultimate, and Enterprise.
How to Take a Partial Screenshot With Snipping Tool
If you only need a specific area of the screen, Snipping Tool is often more convenient than Print Screen.
Follow these steps:
- Click the Start button.
- Search for Snipping Tool.
- Open the application.
- Select New.
- Choose the appropriate snip type if available.
- Select the area you want to capture.
- Review the screenshot.
- Click the save option.
- Choose a filename and location.
The advantage is that you can select the part of the screen you actually need instead of capturing the entire desktop.
What If Snipping Tool Is Missing?
Not every Windows 7 installation includes the same built-in tools.
For example, Microsoft’s archived support discussions indicate that Windows 7 Starter did not include the Snipping Tool, while several other editions did.
If you cannot find Snipping Tool, you can still use the Print Screen method.
Press:
PrtSc → Open Paint → Ctrl + V → Save
This is one of the simplest screenshot methods available on Windows 7.
Where Is the Print Screen Key?
The Print Screen key is normally located toward the upper-right area of a standard keyboard.
Depending on the keyboard, it may be labeled:
- PrtSc
- PrtScn
- PrntScrn
- Print Screen
Microsoft notes that the key is usually located in the upper-right section of the keyboard.
On some laptops, the Print Screen function may be combined with another key. If pressing it alone does not work, check the keyboard’s printed labels for a function key combination.
How to Save a Windows 7 Screenshot
Pressing PrtSc does not normally create a screenshot file automatically. Instead, the captured image is copied to the clipboard.
You therefore need to paste it into an application such as Paint.
Save a screenshot with Paint
- Press PrtSc.
- Open Paint.
- Press Ctrl + V.
- Select File.
- Choose Save As.
- Select your preferred image format.
- Enter a filename.
- Select a folder.
- Click Save.
PNG is a good general-purpose choice when you want a clear screenshot, while JPEG can produce a smaller file for some types of images.
How to Screenshot a Website on Windows 7
If you want to capture a webpage, first open the page and position it exactly how you want it.
Then choose the method that fits your needs.
For the entire visible screen:
Press PrtSc.
For only the browser window:
Press Alt + PrtSc.
For a selected area:
Open Snipping Tool and select the area.
Keep in mind that these methods capture what is visible on the screen. A very long webpage will not automatically be captured from top to bottom with the basic Windows 7 screenshot functions.
How to Edit a Screenshot After Taking It
After pasting a screenshot into Paint, you can make basic changes before saving it.
For example, you can crop unnecessary areas, resize the image, or add simple markings.
This can be helpful when creating tutorials or explaining something to another person.
A simple workflow is:
Take screenshot → Paste into Paint → Crop or edit → Save
For more advanced editing, a dedicated image editor may provide additional tools.
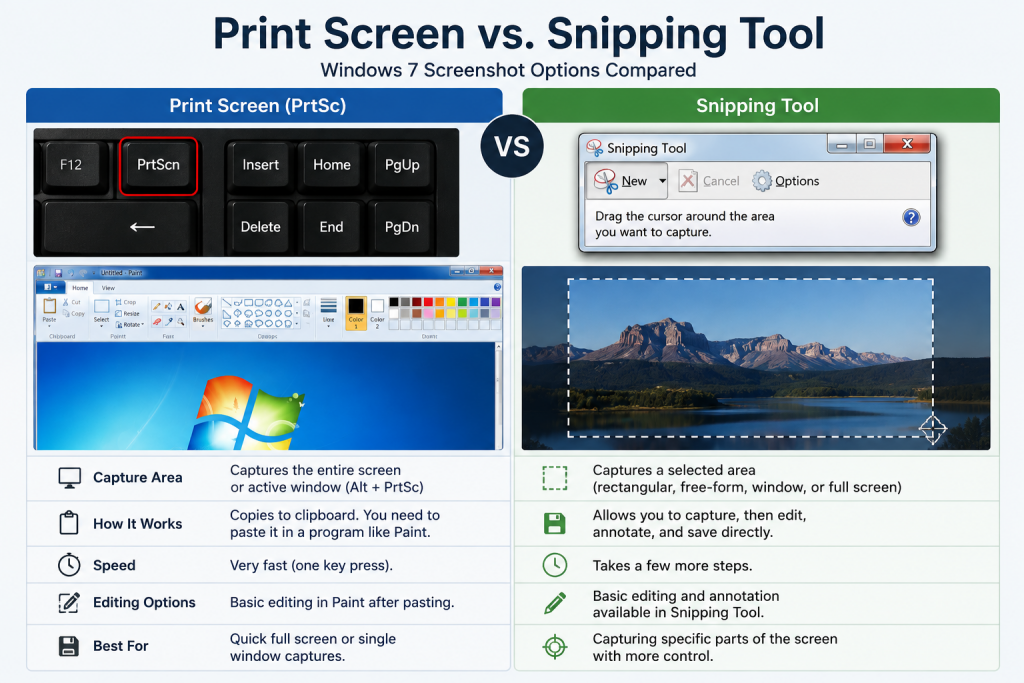
Print Screen vs. Snipping Tool
Both methods can be useful, but they work differently.
| Method | Best For |
|---|---|
| PrtSc | Capturing the entire screen |
| Alt + PrtSc | Capturing the active window |
| Snipping Tool | Capturing a selected area |
| Paint | Pasting, editing, and saving screenshots |
If you only need the whole desktop, Print Screen is probably the fastest option.
If you need a specific part of the screen and your Windows 7 edition includes Snipping Tool, that option can save time.
Is Windows 7 Still Supported?
There is an important consideration for anyone still using Windows 7.
Microsoft ended support for Windows 7 on January 14, 2020. Unsupported versions of Windows no longer receive Microsoft’s regular security updates, software updates, or technical support.
The screenshot methods described above can still be useful on an existing Windows 7 computer, but using an unsupported operating system can increase security risks.
If the computer is still connected to the internet, consider moving to a currently supported Windows version or another supported operating system when practical.
Common Windows 7 Screenshot Problems
Print Screen does nothing
Make sure you are actually pressing the correct key. It may be labeled PrtSc, PrtScn, or Print Screen.
Also remember that pressing Print Screen usually copies the screenshot to the clipboard rather than creating a file immediately.
The screenshot disappears
If you copied a screenshot and then copied something else, the clipboard contents may have been replaced.
Paste the screenshot into Paint soon after capturing it.
Snipping Tool is missing
Your Windows 7 edition may not include the tool. In that case, use Print Screen and Paint instead. Microsoft’s historical Windows 7 information confirms differences between editions.
The screenshot is not the right size
Use Paint’s crop tool to remove unwanted areas after pasting the screenshot.
Final Thoughts
Learning how to screenshot on Windows 7 does not require complicated software.
For a full-screen capture, press PrtSc, open Paint, paste the image with Ctrl + V, and save it.
If you only want the active window, use Alt + PrtSc. If your Windows 7 edition includes Snipping Tool, you can use it to select a specific part of the screen.
Although Windows 7 remains familiar to many users, remember that Microsoft ended its support on January 14, 2020. For security reasons, upgrading to a supported operating system is recommended when possible.
FAQs
How do I screenshot on Windows 7?
Press PrtSc to capture the entire screen, then open Paint, press Ctrl + V, and save the image.
How do I screenshot only one window in Windows 7?
Click the window you want to capture and press Alt + PrtSc. Then paste the image into Paint and save it.
Does Windows 7 have a Snipping Tool?
Yes, Snipping Tool was included with several Windows 7 editions, including Home Premium, Professional, Ultimate, and Enterprise. Some editions, such as Starter, did not include it.
Where does a Print Screen screenshot go in Windows 7?
A screenshot captured with PrtSc is copied to the clipboard. Paste it into Paint or another compatible application before saving it.
What is the shortcut for taking a screenshot on Windows 7?
For the entire screen, press PrtSc. For the active window, press Alt + PrtSc.
Can I screenshot only part of the screen on Windows 7?
Yes. If Snipping Tool is available on your Windows 7 edition, you can use it to select a specific portion of the screen.
Can I edit a Windows 7 screenshot?
Yes. After pasting the screenshot into Paint, you can make basic edits such as cropping and resizing before saving it.